Description
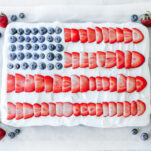
This easy 4th of July flag cake is the prettiest, simplest dessert for your cookout. A cooled cake topped with chilled coconut whipped cream and fresh blueberries and strawberries arranged into an American flag. One of the best, healthiest 4th of July desserts, and the kids love to help.
Ingredients
Units
- (1) 9x13 sheet cake (from a box, bought at the store, or homemade)
- 2 cups thick coconut whipped cream (or any thick whipped cream of your choice)
- 1 pint strawberries, sliced
- 1 pint blueberries (you'll need about 35-45 blueberries depending on their size)
Instructions
- Bake the cake the day before. Make sure it’s completely cooled before using. Use a cake mix that fits any allergy or dietary needs.
- Tip: always add 1/4 teaspoon extra vanilla extract to boxed cake mix to make it taste even better.
- Add 2 cups of coconut whipped cream to the cake and smooth to the edges. Use more as needed.
- At the top left, make the blue “stars” with 5 rows of 7-8 blueberries depending on their size. Take care to face all of the blueberries the same way for symmetry (it will make your cake prettier!)
- Cut off the green tops of the strawberries, place the flat cut top down on the cutting board, then slice your strawberries (the long way) about 1/8 to 1/4 inch thick. Aim to make most of your strawberries the same size if possible. Place them in rows for the “stripes” all facing the same way for symmetry.
- Chill your cake until you serve it. Save the leftover whipped cream if there is any to the side so people can spoon more on if they’d like.
- Enjoy!
Notes
No cake stand? No problem. Flip a sheet pan over and cover it with parchment paper to create your own DIY cake stand.
Frozen berries will bleed into the whipped cream, so use fresh berries for this cake.